
NetSuite Purchase Order: Step-by-Step Guide
Master the NetSuite purchase order process with setup guides, approval workflows, and AI-powered automation tips for smarter procurement.
Executive Summary
The NetSuite purchase order process sits at the center of how finance and procurement teams control spending, enforce approvals, and keep vendor relationships on track. A well-structured PO process means every purchase is captured, routed correctly, and traceable, which matters whether you're managing 50 orders a month or 5,000.
This guide covers how to configure and create purchase orders in NetSuite, set up approval workflows using SuiteFlow, work with blanket POs for recurring purchases, and fix the issues that most commonly slow teams down. It also covers where automation can reduce manual effort across the cycle for teams that have outgrown what a standard NetSuite setup can handle alone.
What Is a Purchase Order in NetSuite?
A NetSuite purchase order is a formal document that records what you're buying, from whom, and at what price which is tied directly to your approval workflows and financial controls. At its core, the process involves creating, approving, and tracking purchase orders so that every purchase is properly documented, authorized, and aligned with budget policy.
By capturing purchase requests systematically, organizations get full visibility into spending, which makes forecasting more accurate and compliance with internal controls easier to maintain.
This guide covers everything from initial configuration to advanced workflow setup, blanket purchase orders, common issues, and where automation can reduce manual effort across the cycle.
Configuring Purchase Orders in NetSuite
Efficient procurement starts with properly configuring purchase orders in NetSuite. A well-set-up purchase order process ensures that every purchase request is captured accurately, routed correctly for approvals, and tracked seamlessly throughout its lifecycle. By configuring NetSuite effectively, organizations can reduce manual errors, improve compliance, and gain real-time visibility into spending. Below is a step-by-step guide to setting up and optimizing purchase orders within NetSuite.
Enable Purchase Order Features
The first step in configuring purchase orders is to ensure that the feature is activated in NetSuite. To do this:
Navigate to Setup > Company > Enable Features.
Under the Transactions subtab, locate the Purchase Orders feature and ensure it is enabled.
Activating this feature unlocks the full functionality of purchase orders, including integration with approval workflows, vendor management, and inventory tracking. It also ensures that purchase orders are recorded within the financial system, allowing accurate reporting and compliance monitoring.
Define Purchase Order Preferences
Once the purchase order feature is enabled, it is essential to configure preferences that align with your organization’s policies:
Go to Setup > Accounting > Accounting Preferences.
Under the Purchasing/Receiving tab, adjust settings such as default approval thresholds, purchase order numbering, and notification preferences.
Setting these preferences ensures consistency across all purchase orders and reduces the risk of mismanagement or delays in approvals. Organizations can also configure preferences to enforce internal controls, such as requiring multiple approvals for high-value orders, or automatically routing orders to specific departments based on purchase type.
Customize Purchase Order Forms
Customizing purchase order forms ensures that all necessary information is captured efficiently and aligns with your company’s branding and operational requirements:
Access Customization > Forms > Transaction Forms.
Select the standard purchase order form and modify fields as needed. This may include adding fields for cost centers, project codes, or internal notes.
Adjust the layout to improve readability and usability for end-users.
Custom forms not only improve user experience but also help in capturing critical data that supports compliance, reporting, and auditing. Additionally, branded forms reinforce professionalism when communicating with vendors.
Creating a Purchase Order in NetSuite
Creating a purchase order in NetSuite is a straightforward yet crucial step in keeping your procurement process smooth, accurate, and compliant. Here’s how to approach it effectively:
Navigate to the Purchase Order Screen
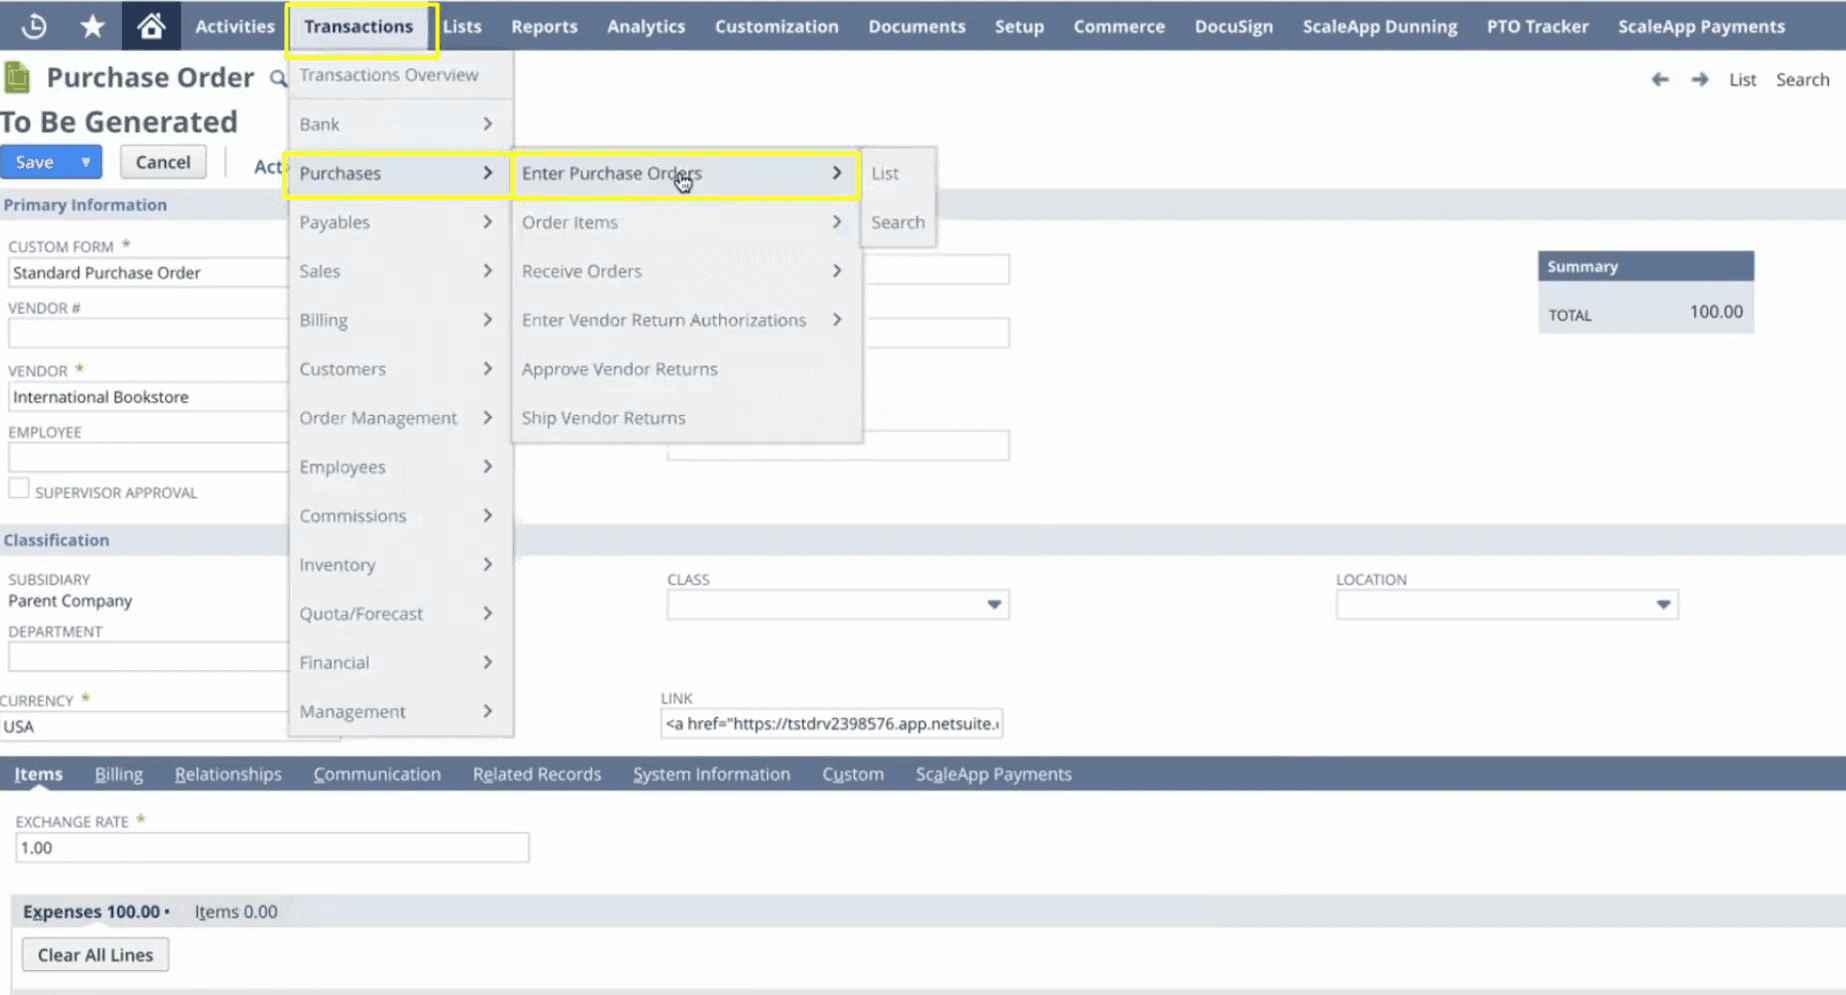
Start by going to Transactions > Purchases > Enter Purchase Orders. This is your hub for creating and managing all purchase orders within NetSuite.Select the Vendor
Choose the correct vendor from your approved supplier list. Picking the right vendor ensures you stay aligned with contracts, negotiated rates, and compliance requirements.Add Items and Quantities
Enter the items you need along with quantities, unit prices, and any additional details such as shipping instructions or expected delivery dates. Accurate data entry here reduces errors and prevents issues downstream in inventory or accounting.Review and Save
Double-check all information to confirm accuracy, compliance, and budget alignment. Once everything looks correct, save the purchase order to move it into the approval workflow.Customize the Purchase Order Form
NetSuite allows customization of standard forms to capture additional information, align with company branding, and support internal reporting needs. This ensures purchase orders are consistent, professional, and tailored to your organization.
By following these steps, finance and procurement teams can create accurate, compliant, and easy-to-track purchase orders in NetSuite.
Industry Insights: IBM's Institute for Business Value reports that organizations adopting AI in procurement anticipate a 12% improvement in overall ROI, alongside 20% productivity gains, 14% operational efficiency increases, and 11% profitability boosts
Common NetSuite Purchase Order Issues and How to Fix Them
Most NetSuite PO problems trace back to a handful of configuration gaps rather than system bugs. Here are the ones procurement and finance teams run into most often, and how to resolve them.
Issue | Likely Cause | Fix |
PO is stuck in approval with no action taken | SuiteFlow misconfiguration or an approver role assigned to an inactive user | Check workflow conditions under Customization > Workflow. Confirm every approval role maps to an active employee with login access |
Vendor not appearing in the PO screen | Vendor record is inactive or missing a default currency | Reactivate the vendor record and verify currency settings on the vendor profile page |
PO amount does not match the invoice | Line item pricing not updated from the current vendor contract | Use vendor-specific price levels or pricing lists in NetSuite to keep rates in sync automatically |
Blanket PO releases not tracking against the agreement | Release orders not linked to the correct BPO record | Confirm the BPO reference field is populated on every release order at the time of creation |
PO resets to pending after an edit | Expected NetSuite behavior — any edit to an approved PO triggers re-approval | Communicate this to requestors upfront; if it becomes frequent, tighten edit permissions via role settings |
Vendor not receiving PO notification | Email notification not configured or vendor record missing primary email | Check Setup > Company > Email Preferences and confirm a valid primary email on the vendor record |
These issues account for the majority of procurement team support tickets on NetSuite. Most take under 10 minutes to fix once you know where to look.
The harder problem is volume. McKinsey estimates that digitizing the source-to-pay cycle can automate up to 60% of manual procurement tasks, which means teams still managing approvals and exception-handling manually are carrying a workload that could largely be offloaded. Fixing configuration issues gets you back to baseline. Automation is what moves you past it.
Understanding NetSuite Blanket Purchase Orders
What is a Blanket Purchase Order?
A blanket purchase order (BPO) is a powerful tool for organizations that make recurring purchases from the same vendor over a set period. Unlike a standard purchase order, which is created for a one-time transaction, a blanket purchase order allows businesses to consolidate multiple purchases under a single agreement with pre-negotiated pricing and terms. This not only simplifies procurement but also improves budgeting, cost control, and vendor management. By using blanket purchase orders, companies can reduce administrative overhead, minimize repetitive data entry, and maintain better visibility over spend commitments.
Creating a Blanket Purchase Order in NetSuite
NetSuite makes creating and managing blanket purchase orders straightforward. Here’s how:
Navigate to the Blanket Purchase Order Screen
Go to Transactions > Purchases > Enter Blanket Purchase Orders to access the module.Fill in Vendor and Item Details
Select the vendor and specify the items, quantities, and negotiated pricing for the period. Accurate entry ensures compliance with contracts and prevents discrepancies.Set Effective Dates and Terms
Define the start and end dates for the agreement and any other terms such as delivery schedules, minimum order quantities, or billing instructions.Save and Review
Once all details are entered, save the blanket purchase order. This triggers NetSuite’s tracking and approval workflows, ensuring the agreement is monitored and adhered to.
Implementing blanket purchase orders in NetSuite allows organizations to gain greater control over recurring purchases, reduce procurement cycle times, and free procurement teams to focus on more strategic activities, all while maintaining compliance and accuracy in spend management.
Configuring NetSuite Approval Workflows
Efficient approval workflows are a cornerstone of the NetSuite purchase order process. They ensure that every purchase aligns with organizational policies, spending limits, and compliance requirements. NetSuite’s SuiteFlow enables finance and procurement teams to automate these workflows, reducing manual effort while maintaining control and transparency.
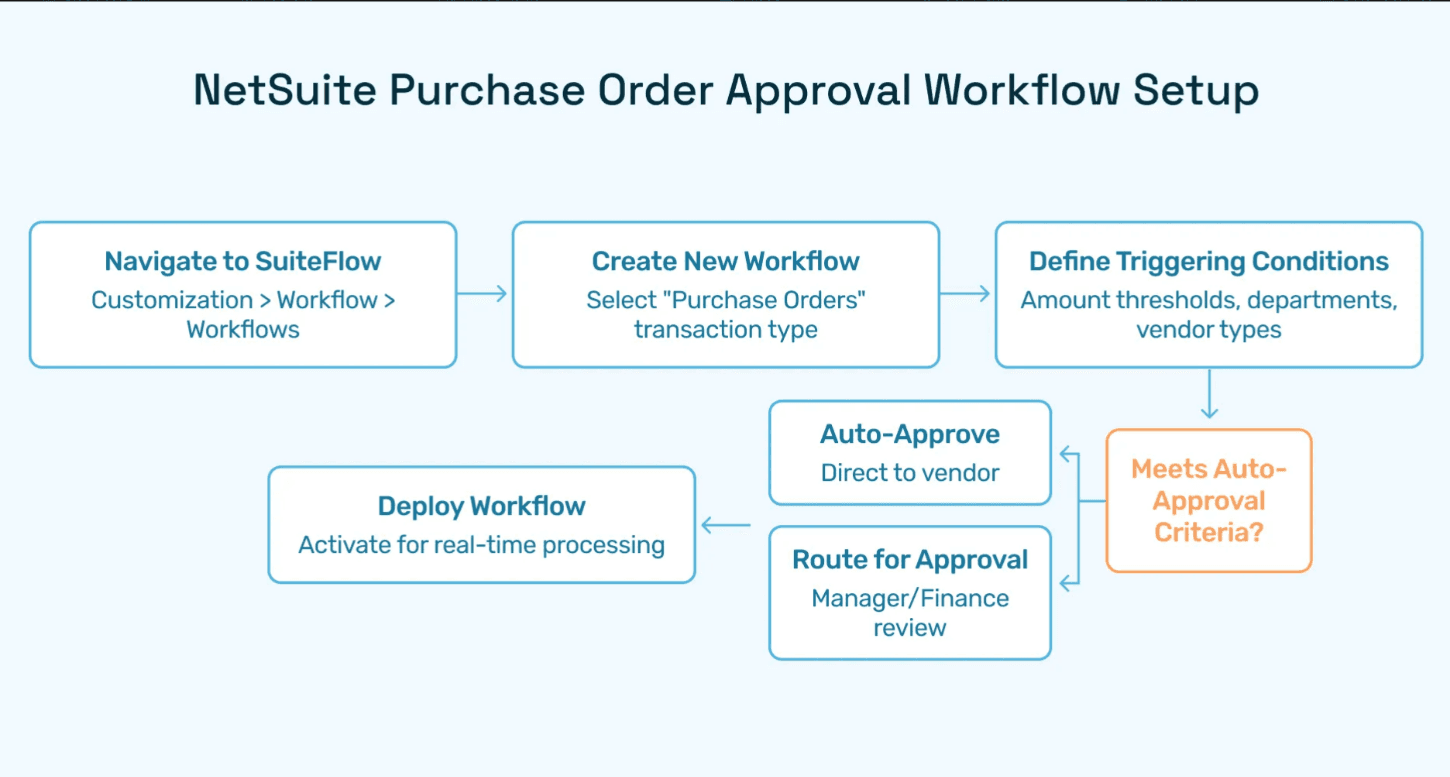
Steps to set up a purchase order approval workflow in NetSuite:
Navigate to SuiteFlow: Go to Customization > Workflow > Workflows to access the workflow management area.
Create a new workflow: Select “Purchase Orders” as the transaction type to start a workflow specifically tailored for purchase approvals.
Define triggering conditions:
Amount thresholds (e.g., orders above $5,000 require multiple approvals)
Department or project-specific rules
Vendor types or risk levels
Set approval routing: Automatically route purchase orders to the appropriate managers or finance personnel based on roles and authorization levels.
Deploy the workflow: Activate it to automatically handle approvals in real time, minimizing bottlenecks.
Benefits of automating approvals:
Reduces human error and duplicate approvals
Provides full visibility into pending and completed approvals
Frees finance teams to focus on strategic procurement decisions
Automating purchase order approvals in NetSuite ensures efficiency, compliance, and accountability, allowing organizations to optimize their procure-to-pay process.

Deloitte's survey of over 100 Chief Procurement Officers indicates that organizations believe Generative AI will unlock value through enhanced insights and decision-making, productivity gains, and cost optimization.
Managing Purchase Order Approvals
Once purchase orders are created and routed through NetSuite’s approval workflows, the next crucial step is managing the actual approval process. Proper handling of approvals ensures compliance with organizational policies, maintains accurate financial records, and accelerates the overall procurement cycle.
Step-by-step guide to approving purchase orders in NetSuite:
Log in to the Employee Center: Begin by accessing the NetSuite Employee Center using your authorized credentials. This centralized dashboard provides an overview of tasks pending your attention, including purchase order approvals.
Navigate to Approve Purchase Requests: Within the Employee Center, locate the Approve Purchase Requests section. Here, all purchase orders awaiting approval will be listed, along with key details such as vendor name, order amount, and requested items.
Review the purchase order: Before approving, carefully verify the purchase order details, ensuring quantities, pricing, and vendor information align with company policies and budget limits.
Select and approve: Once reviewed, select the relevant purchase order and click “Approve”. For high-value or multi-level approvals, NetSuite will automatically route the order to additional approvers as defined in the SuiteFlow workflow.
Best practices for managing approvals:
Regularly check the approval queue to prevent delays in procurement
Use NetSuite’s audit trail features to track who approved each order and when
Ensure alignment with department budgets and overall procurement strategy
By following these steps and best practices, organizations can maintain control, transparency, and efficiency throughout the purchase order approval process. Efficient approvals not only accelerate procurement but also strengthen compliance and financial oversight.
Best Practices for Purchase Order Management
Effective purchase order management is essential for organizations seeking to streamline procurement operations, maintain compliance, and gain better control over spending. Implementing structured processes and following best practices can significantly improve efficiency while reducing errors, delays, and costs. Here are some proven strategies to optimize your purchase order processes in NetSuite.
1. Standardize Procedures
One of the most important steps in purchase order management is developing and enforcing standardized procedures.
Standardization ensures that all purchase orders are created consistently, approved by the right personnel, and tracked accurately.
By defining clear rules for how purchase requests should be submitted, reviewed, and authorized, organizations can reduce confusion and improve accountability.
Standardization also facilitates reporting and auditing, making it easier for finance teams to monitor spending patterns and identify anomalies.
2. Conduct Regular Audits
Regular audits are critical for maintaining compliance and uncovering inefficiencies in the purchase order process.
Audits help ensure that approvals are being followed, purchase orders are accurately recorded, and policies are consistently applied across departments.
They can also highlight potential issues such as duplicate orders, unauthorized spending, or discrepancies between purchase orders and invoices.
Scheduling periodic reviews of purchase order activity helps organizations proactively identify risks, enforce controls, and continuously improve processes.
3. Provide Ongoing Training
Even the most sophisticated systems require well-trained staff to operate effectively.
Providing ongoing training ensures that employees understand best practices, know how to navigate NetSuite’s purchase order features, and remain aware of any system updates or policy changes.
Training can be delivered through workshops, internal documentation, or online learning modules.
Empowered employees are more likely to follow procedures correctly, make informed decisions, and contribute to a more efficient procurement cycle.
4. Integrate with Inventory and Accounting Systems
Integration is a key factor in optimizing purchase order management.
By connecting purchase order processes with inventory and accounting systems, organizations gain real-time visibility into stock levels, budgets, and financial commitments.
This ensures that purchase orders reflect actual business needs, reduces the risk of over-ordering or stockouts, and streamlines reconciliation between purchase orders, invoices, and payments.
Integration also supports automated workflows and reporting, enabling teams to make faster, data-driven decisions.
By implementing these best practices, organizations can significantly enhance their purchase order process, reduce operational errors, and drive efficiency throughout the procure-to-pay cycle.
How AI Automation Improves the NetSuite PO Process
NetSuite handles the mechanics of purchase order management well. The gaps show up at volume: approval queues that back up when managers are traveling, invoice mismatches that need manual investigation, vendor follow-ups that fall to whoever has time. For teams processing hundreds of POs a month, these aren't edge cases, they're the daily workload.
The data on this is consistent. IBM's Institute for Business Value reports that organizations adopting AI in procurement anticipate a 12% improvement in overall ROI, alongside 20% productivity gains and 14% operational efficiency increases. PwC's 2024 Digital Procurement Survey, which covered more than 1,000 companies across 58 countries, found that efficiency gains, process transparency, and better compliance are the three primary realized benefits of procurement automation. Deloitte's Global CPO Survey found that 71% of procurement leaders rank cost reduction and margin protection as their top priority — and automation is increasingly the mechanism they're using to get there.
Hyperbots addresses this with AI Co-Pilots that automate key steps across the PO lifecycle, integrating directly with NetSuite rather than replacing it.
Procurement Co-Pilot handles PO creation, approval routing, and vendor notifications. Orders are created and routed according to your policies without manual intervention, which removes the bottleneck between request and approval.
Invoice Processing Co-Pilot cross-references invoices against purchase orders and receipts automatically. This cuts down on duplicate payments and clears the manual reconciliation queue that most AP teams spend significant time on each week.
Vendor Management Co-Pilot automates onboarding, compliance checks, and performance tracking, so teams have current vendor data without maintaining it by hand.
All three run inside NetSuite, so existing workflows, approval rules, and reporting structures stay in place.
Documented results from Hyperbots' Procurement Co-Pilot:
Over 80% reduction in PO creation and dispatch time
5-minute purchase requisition creation time
At least 10% reduction in cash outflows
100% automation of forms and information verification
More predictable approval timelines, which vendor teams consistently flag as improving the working relationship
For teams managing high PO volumes in NetSuite, the question usually isn't whether automation would help, it's which parts of the process to start with. The approval queue and invoice matching tend to deliver the fastest return.
FAQs
Q1. What is the difference between a standard and a blanket purchase order in NetSuite?
A standard purchase order covers a single transaction with a vendor. A blanket purchase order is an agreement for multiple purchases from the same vendor over a set period, at pre-negotiated prices. Use blanket POs for recurring supplier relationships — they reduce the admin overhead of creating a new PO every time and give you better pricing consistency because terms are locked upfront.
Q2. What is the difference between a purchase order and a purchase requisition in NetSuite?
A purchase requisition is an internal request to buy something. It triggers the approval process but never goes to the vendor. Once approved, it converts into a purchase order, which is the formal document the vendor actually receives. NetSuite can be configured to generate a PO automatically from an approved requisition, removing the manual handoff between the two steps.
Q3. How do I create a purchase order in NetSuite?
Go to Transactions > Purchases > Enter Purchase Orders. Select your vendor, add line items with quantities and unit prices, then review and save. NetSuite assigns a PO number automatically and routes the order into your approval workflow. If you need to create POs in bulk, NetSuite's Demand Planning and Advanced Inventory Management modules support that as well.
Q4. What NetSuite role do I need to create a purchase order?
You need the Purchasing Agent role or a custom role with purchase order creation permissions enabled. If you can navigate to Transactions > Purchases but the option to create a PO is missing or greyed out, the issue is almost always a transaction permission gap in your role. Check under Setup > Users/Roles > Manage Roles and look at the Transactions subtab for your role.
Q5. How can I automate purchase order approvals in NetSuite?
Use NetSuite's SuiteFlow under Customization > Workflow > Workflows. Create a new workflow for Purchase Orders, define your triggering conditions (amount thresholds, department, vendor type), set approval routing rules, and deploy. Once active, SuiteFlow routes orders to the right approvers automatically without any manual forwarding. For mass approvals, the Employee Center lets approvers review and action multiple POs in one session.
Q6. Can I edit a NetSuite purchase order after it has been approved?
Yes, but any edit to an approved PO resets it to pending approval status, and the order has to go back through the full workflow. This is expected NetSuite behavior, not a bug. If your team is editing approved POs frequently, it usually signals that the original PO is being created with incomplete information. Tightening required fields on your PO form at creation is a faster fix than trying to adjust the re-approval behavior.
Q7. How do I close a purchase order in NetSuite?
Open the purchase order, click Edit, then change the status to Closed. If you only want to close specific line items rather than the whole order, check the Closed checkbox next to each relevant line. Closing a PO prevents any further receipts or invoices from being applied against it. This matters for your period-end reporting — open POs with no expected activity inflate your outstanding commitments and can distort budget visibility.
Q8. What is three-way matching in NetSuite and how does it relate to purchase orders?
Three-way matching is the process of verifying that the purchase order, the goods receipt, and the vendor invoice all align before payment is released. NetSuite's Advanced Procurement module supports this natively. When an invoice arrives, NetSuite compares it against the original PO and the receipt record. Discrepancies in quantity or price are flagged automatically, which prevents duplicate payments and catches pricing errors before they hit your accounts payable.
Q9. How do I link a purchase order to a vendor contract in NetSuite?
When creating a purchase order, you will see a Purchase Contract field in the header. Select the relevant contract from the dropdown — this only appears if the vendor has an active purchase contract on file. Once linked, NetSuite applies the contract pricing automatically to the PO line items and tracks how much of the contract value has been consumed across all linked orders. This gives buyers real-time visibility into contract utilization without manual tracking.
Q10. What happens when a purchase order is fully received in NetSuite?
When all line items on a PO have been received and matched, NetSuite automatically updates the PO status to Fully Billed or Closed depending on your settings. You can track receipt status directly on the PO record under the Items subtab, which shows quantities ordered, received, and billed per line. If a partial receipt comes in, the PO stays open for the remaining quantity until the balance is received or you manually close the line.
